
Google “tools to collaborate remotely” and you will get a list of the usual suspects – Trello, Slack, Zoom etc. That is all communication focused, and that’s great, but we are developers. What about the coding environment and the code – can I use Docker to collaborate with my team-mates on code development?
Let me set this up – we use Python, all are remote, all use different machines, different OSes. And there is no IT department, so everything is self-maintained. We use GitHub, but that is only the code. We could use Virtual Environment (virtualenv or venv), but everyone would have to manage it independently on their setup. That can work, but changes to the environment (adding a new python package etc) can become a hassle – where is that IT department when you need it!
Code Development using Docker?
On the face of it – yes. For starters it takes the OS, machine related concerns off the table. Docker provides an independent “container” and isolates the code from everything that’s not in the container. Don’t have to worry about hidden dependencies. But we still have some questions:
- Docker seems like a solution for project release or deployment. Is it convenient to work with during development? Can multiple collaborators work on code development using Docker? How would that work? What does the setup look like?
- How often do I have to build the Docker image – every time I want to run code, do I need to build a new docker image? (That would be a pain)
- How heavy is the image – how much extra memory?
- Execution time – is executing code from within the Docker container slower?
- Is Docker easy to setup on any machine? How much extra stuff, effort is it?
We are going to try to answer these questions. First, what is Docker?
What is Docker?
Docker is the “industry standard” approach for implementing containers.
Containers encapsulate an application as a single executable package of software that bundles application code together with all of the related configuration files, libraries, and dependencies required for it to run.
– ibm.com/cloud/learn/containerization (link)
Here is a great video (by Liz Rice, GOTO 2018) that explains the concept and walks through the basics of building a container (like Docker) from scratch in Go. I like to look under the hood first!
The above video provides a great explanation (please do watch the video). Follow that up with this one from the Docker site that does a walk through on how to use Docker. Both show the deployment scenario – a web service released as a containerized solution. That does not address our needs.
There is this series of blog posts that does address python code development using Docker. I am going to follow this and set up a containerized python development environment. Let’s get going.
Installing Docker
- The first step is to create a Docker hub account – required if we want to save and share Docker images. I will be creating Docker images on a Windows machine (or Linux running on Windows), then linking them and sharing through the hub – more on this later though.
- Install Docker on the desktop (Windows 10 pro, ver. 2004). Here is the link to the relevant Docker documentation. (WSL has replaced Hyper-V, so, a) ignore the instruction about Hyper-V; and, b) here is a page that provides more details about Docker and WSL.)
- Execute the downloaded file, follow the prompts. Launch Docker and follow the instructions – you will download from a git repo, build a docker image, and finally run the image. This launches the docker tutorial in a container.
- The Docker window should look like (Docker Desktop on a Windows machine)

- Hover over the docker-tutorial and click the browser button. This pulls up a docker tutorial.
Testing the Installation
One option is to follow through the tutorial above (and that’s a good option). A second option, especially if you want to quickly check the installation, is:
- Open a terminal/console window
- Test the installation by running the Hello-World docker image (source)
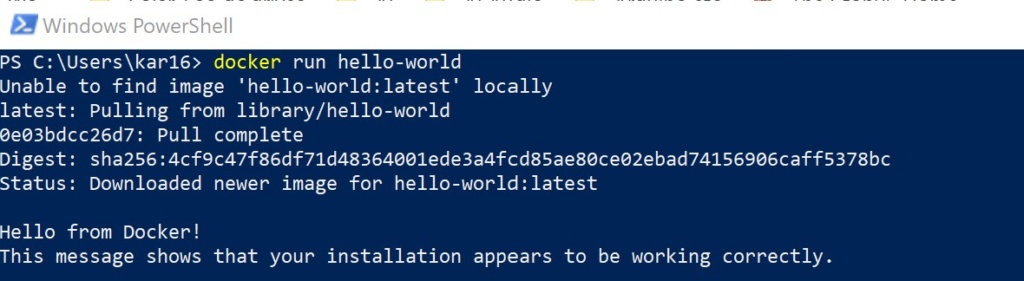
- Try: C:\Users\username> docker ps -all
Now that Docker is setup, lets create out first Python image
Getting Started with Docker
Before diving in, lets briefly look at what a Docker Image and a Container actually is. These are the key building blocks and understanding them is a must if we want to be effective in our use of Docker. A Docker Image encapsulates an application and the related configuration files, libraries, and dependencies required for it to run. To illustrate, I will create a python app image that encapsulates Python3.8 (or another version), the python package Numpy, and the application code. A Dockerfile captures these various components, which create an image. To run the application, the image is executed, as a container. A container thus is an instantiation of the image. Multiple containers can have the same image. In general, they are all independent of each other, but dependencies can be created.
In the example above, I downloaded the “hello-world” image (created by someone else) and ran it as a container (docker run hello-world). What did docker do? Docker downloaded the image, created a container and executed the application that was specified in the image, within the container.
Some common Docker commands:
docker --help  -> a big list of all the commands you can use
docker build  -> to build an image from the Dockerfile
docker build --help  -> help on the create command. use with any command
docker run  -> create container from image, run the application specified in the image
docker create  -> creates a container from image
docker start/stop  -> to start/stop a container
docker ps  -> see what is running (containers)
docker rm -> to delete container
docker rmi  -> to delete an image
docker images  -> to see all the images
Check here for detailed explanations and examples.
Python using Docker
Python Shell in a Container
We saw above how to execute a docker image as a container. Let’s now create a docker image. As a first step, I want to run python in a container. A textfile (called Dockerfile by default) defines the image. The Dockerfile to run python in a container looks like (for the code head on over to the github repo):
# This is a Dockerfile to build and run a python shell in a container
# set base image (host OS)
FROM python:3.8
# set the working directory in the container
WORKDIR /code
# command to run on container start
CMD [ "python"]
The first line of code above defines the base docker image, in this case Python3.8. The next line sets the working directory within the container. Finally, the last line tells docker what command to execute when the container starts.
Now lets build the image from the Dockerfile we created above, using the docker build command:
C:\Users\kar16\Desktop\Docker_testing> docker build -t python_basic:v0 .I have given the image a name and a tag by using the -t name:tag above. Docker by default looks for the Dockerfile in the current directory so I did not have to specify it. After creating it, you can check the image created by using docker images command.
Once the image is created, I can run it – which creates a container, and executes the specified command (“python”) in the container.
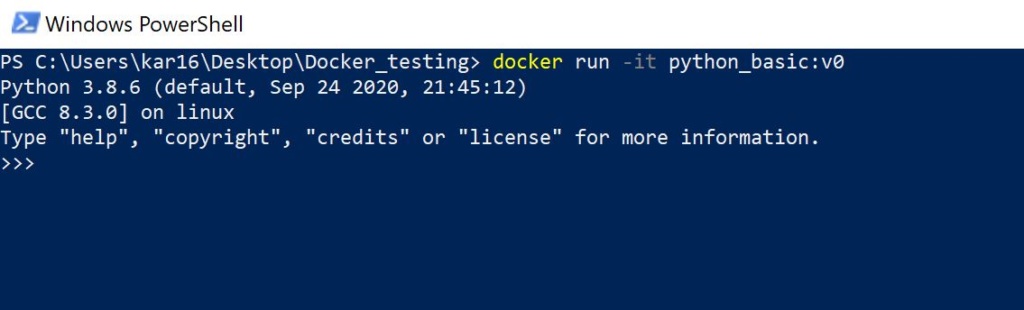
The command (see in the figure above) is docker run <image_name>:<tag> . I have used the -it option which specifies run interactively and allocate a tty (use docker run –help for details).
Python script in a Container
In the previous section, we created a container running python3.8 in isolation from any packages etc installed on the machine. I can now share this image with anyone and they will run python3.8 irrespective of their machine and their current setup.
But this is not really useful – I need a few more things. One, I need to install relevant packages, and two, our code. To do that modify the Dockerfile so it looks like:
# set base image (host OS)
FROM python:3.8

# set the working directory in the container
WORKDIR /code

# copy the dependencies file to the working directory
COPY requirements.txt .

# install dependencies
RUN pip install -r requirements.txt

# copy the content of the local src directory to the working directory
COPY src/ .

# command to run on container start
CMD [ "python", "-i", "./test.py"]
I am doing a few additional things in this Dockerfile. First, copy the requirements.txt file which specifies the packages needed to run the code. Then install the packages (using pip). Lastly copy over the source code. The command to be executed in the container is also changed so it will execute the specified python script.
The application code is trivial and for illustration only (test.py below).
# Testing docker setup

import numpy as np
from pathlib import Path

print('the current folder is {}'.format(Path.cwd()))
data = np.arange(1, 25)
print('the average is {}'.format(np.average(data)))
Once again, build the image, as follows,
C:\Users\kar16\Desktop\Docker_testing> docker build -t python_basic:v1 .… and run the container. The output looks like:
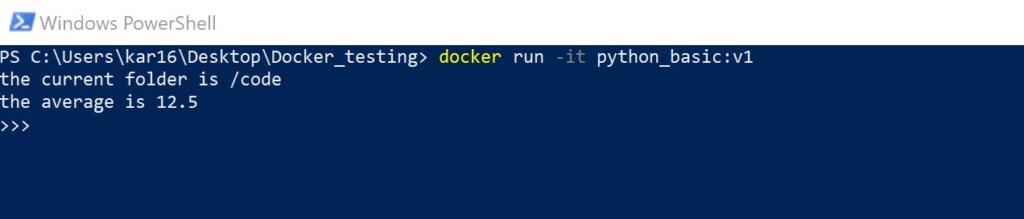
This runs in the container – notice the current folder is /code. This is also an interactive session, so the python shell and the container does not exit.
Mounting a local directory into the Container
Lets say we need to change test.py, our application (code development, then use the docker container as the execution environment). The current containerized development cycle consists of writing/updating code, building the image, running as a container and debugging it. There is one issue with this. Every time the code changes, the image needs to be rebuilt in order to get the Python code updates into the container.
We can however apply code changes without having to rebuild the image. We can do this simply by bind-mounting the local source directory to its path in the container. Launch the container, as follows:
docker run -it --mount type=bind,source="$(pwd)"/src,target=/code python_basic:v1The docker run -it python_basic:v1 is the same as before. The –mount type=bind,source=”$(pwd)”/src,target=/code mounts a local folder, specified by source=, to the target folder in the container, specified by target=
For details check out this docker doc.
And that’s it. Now, whenever the code changes, rerun the container, and it will pick up the new code.
Recap
I started this post as I started learning Docker. In the beginning I asked a few questions, and its time to revisit them. But before I do that, a quick recap.
My Docker journey so far:
- Installed Docker Desktop on my Windows PC, and created a hub.docker account
- Understood the terms – what is a docker image, a Dockerfile, a container
- Downloaded my first docker image, ran it in a container
- Wrote a Dockerfile (created an image) to start a python shell in a container
- Created another image to run a python app in a container
- Mounted a local directory into a container for continuing code development of the python app, with execution in a Docker container.
The code I have used above, including the dockerfiles, is all available in github here.
Q and A
Back to the questions at the top of this post:
Is Docker convenient to work with during code development?
I believe the answer is yes it is. With the setup as described here, I can make changes to the application code, and rerun it in a container with a single line shell command. Its almost as easy as running it by typing python app.py in the shell.
How often do I have to build the Docker image – every time I want to run code, do I need to build a new docker image?
No. Map the local source code directory into the container.
How heavy is the image – how much extra memory?
Python images are large. The first basic python3.8 shell image I created in this post – 882MB. The good news is that we should need to create only one image per project. And the image should not need to be re-created very often. When it comes to building an image for deploying the app, there are ways to reduce the image size by including only what is required.
Execution time – is executing code from within the Docker container slower?
I still have to explore this. There is, understandably, a small overhead associated with creating the container, but I have not measured execution times.
Is Docker easy to setup on any machine? How much extra stuff, effort is it?
Setting up Docker on my machine was straight forward – I had no issues. Took me a couple of days to wrap my head around the concepts, terms etc but that is personal.
Docker or Virtual Environment?
While setting up and using Docker is easy, and its utility is unmatched in certain scenarios (sharing a demo, deploying an app etc). But is Docker the right solution during development? Having gone through the setup above and trying out Docker, I feel it would be remiss of me if I don’t compare with using virtual environments during development.
Jupyter notebooks is one key reason to use virtual environments. It is an easy and convenient way to develop code. So I am going to look at virtual environments using conda.
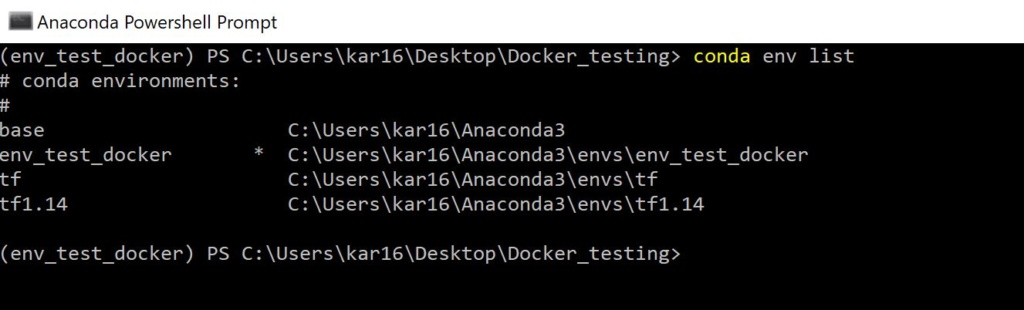
Create a virtual environment like this (at the Anaconda Powershell Prompt):
conda create -n env_test_docker python=3.8Activate the virtual environment:
conda activate env_test_dockerYou can see the environments by typing conda env list in the Anaconda shell (see below; note the current env has an ‘*’ before the name)
Once in the new environment, the next step is to install the required packages. Do it as follows:
pip install -r requirements.txtThe packages can be installed during the environment creation using an environment.yml file. See here for more details on conda env.
Once the packages are installed, this setup should work across platforms. There is no isolation though, and there might be issues due to underlying platform, and individual management of the virtual environment.